Create a mailing list
The structure of BACKCLICK assumes thatIn BACKCLICK every subscriber
needshas to be
a memberpart of at least one mailing list.
BACKCLICK users will be ableBy means of this belonging it is possible to send a newsletter or a
direct-marketingcampaign to
every subscriber on these special mailing lists. Subscribers may sign up/unsubscribe for a newsletter or change their profile as soon as one mailing list has been created. BACKCLICKa specific mailing list. Only after a mailing list is created, subscribers may subscribe, unsubscribe or change their profile using the WebInterface. Likewise, users cannot create or import subscribers until
onea mailing list
has been createdis configured.
ToIn order to see whether your administrator has already created the required
lists, go to the menu for Newsletter - Redaktion -> Newsletter schreiben The lists are available as soon as they appear on the menu.If your administrator has already created the required lists, there is no longer a need to start a new mailing list. In that case, you can go on to chapter Anlegen der ersten Abonnenten
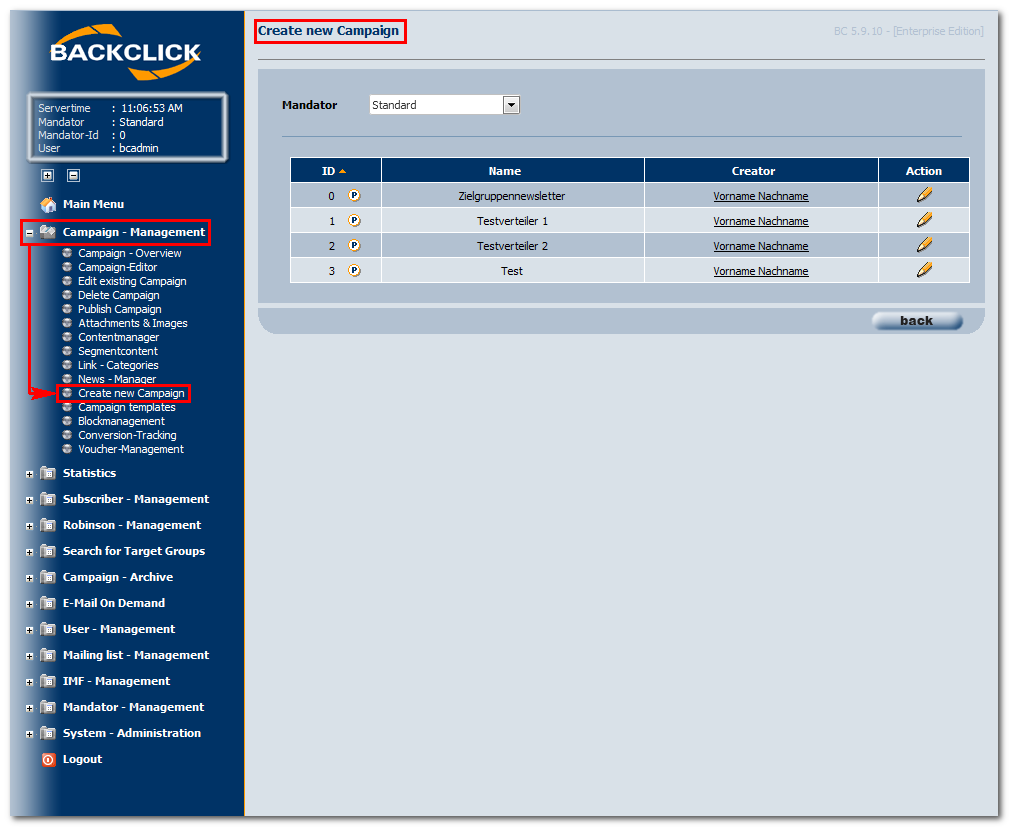
Abb. 3.2 - Newsletter schreiben (Beispiel mit bereits angegelegten Verteilerlisten)
If you do not see a mailing list here you must create one now. Choose the menu item Verteilerlistenverwaltung -> Verteilerliste anlegen.list(s), look at the menu item Campaign - Management -> Create new Campaign. The corresponding list(s) available to create a newsletter will be displayed.
Creating a new mailing list is not necessary in this case and you may switch to the chaper Create the first subscriber.
Fig. 3.2 - Create new Campaign (Example with mailing lists available)
If there is no mailing list available you have to create a new one in BACKCLICK. Choose the menu item Mailing list - Management -> Create Mailing list.
The first mailing list you create will get the ID 1
. The second mailing list, the second one will get
ID2the ID 2, and so on.
ThoseThese IDs will be important
when you want import data. You will also need them for subscribing to and unsubscribing from HTML templates. Choose the menu item Verteilerliste anlegen to open the following view:for importing data and creating your HTML templates for subscription and unsubscription.
After choosing the menu item Create Mailing list you will see the following screen:
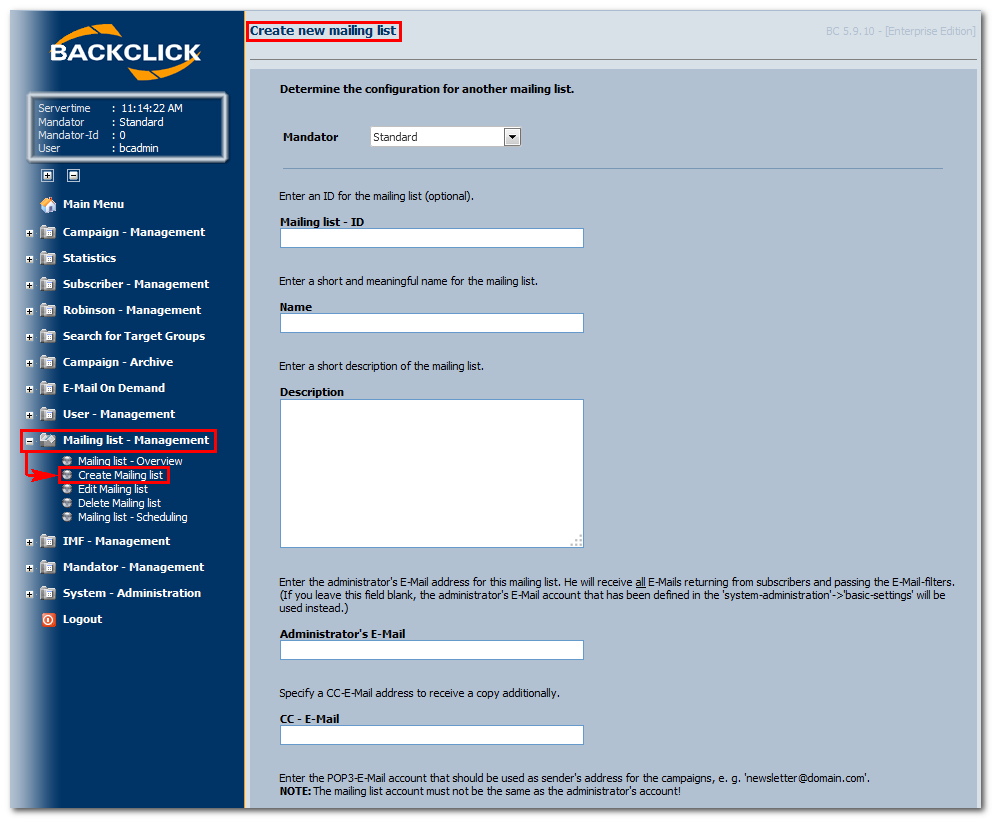
Figure 3.2.1 — Create mailing list (without
entriesinput)
Before you get started,
you will need to havethe following information have to be available:
- E-mail address that will be shown as the sending
- E-
- Mail address.
- Alternative name that will be shown as the sender's name in the
- E-
- Mail client of the subscriber.
- E-Mail address of the administrator that recieves the returned E-Mails that could not be handled automatically
- E-Mail address of the deputy administrator that recieves the returned E-Mails that could not be handled automatically as well (optional)
- POP3 access information for the account of the sender's
- E-
- Mail address (
- username, password, host, port)
- SMTP server that is in charge of sending the e-mails (host, port,
- possibly user, password)
All
these entriesinput possibilities are described
in more detailbelow.
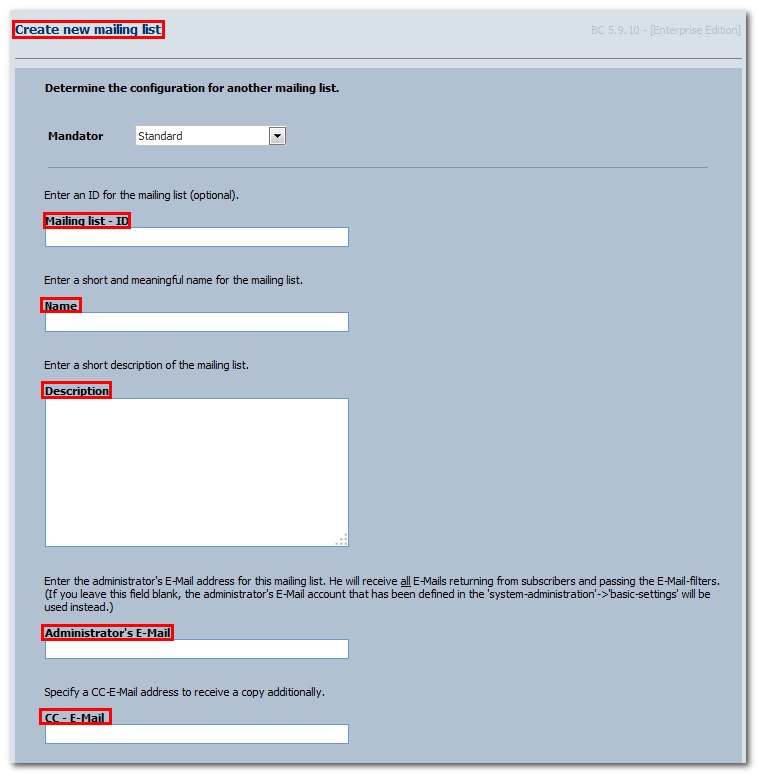
Figure 3.2.1.1 — Create mailing list (
Example entriesInput example, Part 1)
Mailing list ID
You have the option of numbering the mailing list yourself, if you need to do this to sort the mailing list in another orderOptionally, you may provide an ID yourself, in case this is useful for sorting purposes. If this field is left blank, BACKCLICK will
automaticallygenerate sequenced IDs for all mailing lists
that arecreated automatically.
TheThis ID is based on the
time whenmoment the mailing list is saved
in BACKCLICK.
Name
You may name your mailing list here.This name is
showndisplayed in the
administrativeadministrator interface
inof BACKCLICK. You
canmay change it
if you wish to do so.at any time.
Description (optional)
You may enter a
shortdescription
offor your mailing list here. It will only be
shown ifdisplayed when you are editing this list.
Administrator's E-
e-mailThe e-mailEnter the E-Mail address of the administrator
ofthat is supposed to be responsible for this mailing list
is to be enteredhere.
This administratorHe will
alwaysreceive
the eall E-
mails that BACKCLICK could not sort correctly.Mails that are sent back to the distributor account by subscribers and could not be filtered automatically.
CC -
eE-
mailMail (optional)
You may define
an additional e-mail address that will also receive any e-mails that BACKCLICK could not sort.a CC - E-Mail address that receives a copy of these administrator E-Mails.
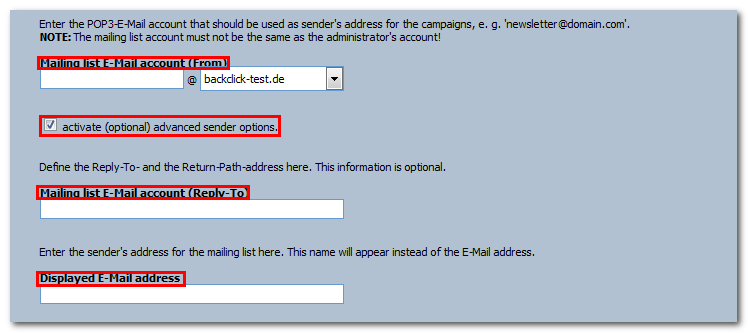
Figure 3.2.1.2 — Create a mailing list (
Example entriesInput example, Part 2)
Mailing list
e- E-
mailMail account
(From) Here you must define the e-mailEnter the senders E-Mail address to be used for sending
the newsletter that goesE-Mails to this mailing list
. For example: "newsletter@domain.de". This
eE-
mailMail address is
showndisplayed as the
sender's e-mail address, at the subscriber's e-mail client. PLEASE"Received from" E-Mail address to the subscribers. NOTE: This account cannot be identical with the
same account as theadministrator
'saccount.
Activate advanced sender options
If the advanced-sender options are activated, you
canmay define additional mailing
-list
eE-
mailMail account addresses for Reply To and Return Path.
- Reply-To
- : The E-Mail address that receives
- reply E-
- Mails. Every
- reply the subscriber sends
- by clicking the
- 'Reply' button will be sent to this
- E-
- Mail address.
- Return-
- Path: The E-Mail address that receives
- E-Mails returned due to unavailability or non-existence of the subscriber's
- E-
- Mail address
Address of dispatch
An alternate name of this mailing list can be entered- . Like described in the interface, bare in mind that the SMTP server defines these E-Mail addresses itself. If you enter an E-Mail address here, double-check if it is the same address as on your SMTP server afterwards.
Displayed E-Mail address
You may enter an alternative sender's name for the mailing list here. This name will be displayed
into the
subscriber's e-mail clientrecipient (subscriber) instead of the sender's
eE-
mailMail address (
the mailingMailing list
e- E-
mailMail account) depending on mail clients.
Mailing list
user nameYou have to must choose a user name for the POP3 e-mail- User name
Enter the username of the POP3 newsletter account of the sender's
eE-
mailMail address here.
User nameUsername and
userpassword are
important for the automatic filter, and for the request function for the “Reply To” e-mails.Password for mailing list
You must choose a password to go with the chosen user name (for the POP3 account).
POP3-server for the e-mail account of the mailing list
Please enter theused to receive and filter reply E-Mails automatically.
Mailing list - Password
Enter the password to the POP3 newsletter account of the sender's E-Mail address here.
POP3 - Server of the mailing list E-Mail account
Enter the POP3 serverhost for your POP3 newsletter account of the sender's
eE-
mailMail address here. If you do not
defineprovide a serverhost
here, BACKCLICK will try to
build up an access to your “localhost” for receiving e-mails.use the local computer ("localhost") to receive E-Mails.
POP3-server timeout
Please define a timeout period for
theaccess to your POP3 server here. If
this server hasa problem
while checking the e-mails, BACKCLICK will stop processing the accessshould occur while retrieving an E-Mail from the POP3 account, BACKCLICK terminates the call after this period of time. The timeout period can be
anywhereanything from 1 to 30 seconds.

Fig. 3.2.1.3 -
Verteilerliste anlegen (Beispieleingaben, AbschnittCreate a mailing list (Input example, Part 3)
SMTP
server #01–#20 Here you must enter- Server #01 - #20
Enter one (or more) dedicated SMTP servers for this mailing list here. If you do not
specify theprovide an SMTP server, BACKCLICK will try to
access your “localhost” for sending the newsletteruse the local computer ("localhost") for dispatch. Enter the
additional access informationlogin details for the SMTP server
here,as well if needed. BACKCLICK supports AMTP, which is used by web.de
andamongst others.
SMTP - Server Timeout
Please define a timeout period for
theaccess to your SMTP server here. If
this server has a problem while checking the e-mails, BACKCLICK will stop processing the accessan error occurs while connecting to the SMTP server, BACKCLICK stops trying to connect after this period of time. The timeout period can be anywhere
from1from 1 to 30 seconds.
PLEASE NOTE: While
you areusing the internal MTA, you will not see menu items:
- SMTP - Server #01 - #20
- and
- SMTP - Server Timeout
because they
willare not
find any connectionused.
For further information, please read
Chapter BACKCLICK MTAchapter BACKCLICK MTA.
Priority
You may define the priority
of sending your newsletter withto be used as default for this mailing list. This
willdoes not affect the
ratespeed of
sending, but the view in the subscriber'syour dispatch but will be shown in your recipients mail client.
Personalization
If you activate
“Personalization” herePersonalization, every subscriber will receive
his or hera personalized newsletter
. This is filledgenerated with personal data from
the BACKCLICKBACKCLICKs database.
You may choose from variables and replacement characters thatVariables available include $$TITLE$$, $$LASTNAME$$
,and others. You
can alsomay add your own replacement characters
to (as well, for example
) $$SIZEOFSHOE$$$$SIZEOFSHOES$$.
TheDispatch rate of
sending apersonalized
newsletternewsletters is
betweenapproximately 100,000
andto 1,500,000
eE-
mailsMails per hour. This rate may vary and it depends on your hardware,
connectionsyour connection, the number of SMTP servers
,and the size of the newsletter
.. Additionally, it is possible to activate Link - Redirect. This feature is available for 'mailto'-links as well.
Link - Redirect
This
function makes it possible to reportfeature enables you to interpret your responses. When
you activateactivating this
functionfeature, hyperlinks will automatically be
automaticallyreplaced by BACKCLICK
overand redirected to the server where BACKCLICK is installed
, andin order to be recorded in the
BACKCLICKstatistical database. Without this activation,
it is not possible to check theyou will NOT be able to see any response data.
(If your links
shouldare not supposed to be changed in any way, please deactivate Link-Redirect.
) PLEASENOTE: BACKCLICK statistics will also be deactivated when
you do this.doing so.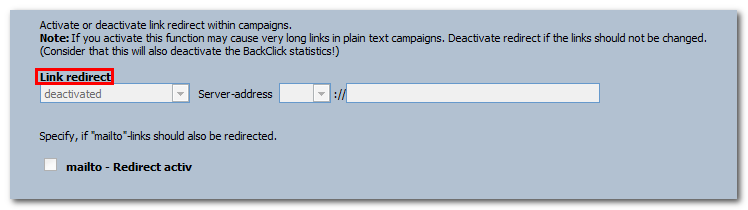
If
the “Personalization”Personalization is deactivated,
link redirect “LinkLink-
Redirect”Redirect and
“Mailto Redirect” are grey-highlighted, and are NOT usable/displaceable.Mailto Redirect are shown greyed out and you are not able to use/set those.


Fig. 3.2.1.4 — Create a mailing list (
Example entriesInput example, Part 4)
Individualization
HereUsing this feature you may
define whether every subscriber should get an individualized newsletterdetermine whether your newsletter content is supposed to be individual for every recipient. If you activate this
functionfeature, the content will be
calculateddetermined by pre-defined logics.
PLEASENOTE: Do not activate this
functionfeature if you do not intend to use it,
becausethe computing time while sending a newsletter will be much higher.
You will only reach sending rates betweenDispatch rate of individualized newsletters is approximately 50,000
andto 100,000 newsletters per hour.
Inline Images
By activating this function, you will be able to send off-line HTML e-mails. For example, if you putActivating this feature enables you to send so called Offline HTML E-Mails. If you link pictures in your HTML newsletter (for example: http://www.domain.de/images/image.jpg
in your newsletter source code (HTML), BACKCLICK will automatically download this picture from the
World Wide Webinternet and embed it
ininto your newsletter. The advantage
hereis that even
thenewer
eE-
mailMail clients like AOL 9.0 or
OUTLOOKOutlook 2003 will display
the eyour E-
mailsMails in the right format
,automatically
,without
the helpany further action of the subscriber.
You may use picture formats like .gif or .jpg. Please consider thatBACKCLICK is able to send gif/jpg pictures as inline images (meaning within the newsletter itself). Please bare in mind that the size of your newsletter will be
muchalot bigger with
aninline
image than without oneimages. You may deactivate this
functionfeature individually for each newsletter
you would like to send, even if you
had previously activated the “Inline Images” function. if you had previously activated the “Inline Images” function.activated it previously.
Default format/
customCustom format
You may choose among theThe following default formats are available:
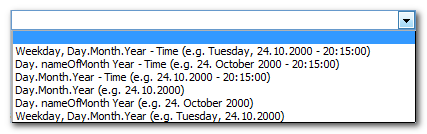
If you do not find the format you need, please define a new one
by clicking on "?"(Custom Format). If you use another format than the one chosen in the system settings, here is what they will look like.using 'Custom Format'. Click the  symbol for help with the syntax. When choosing a new format this replaces your previous default settings for this list.
Activate IVW evaluation
To get an IVW-conformable count of the
openedHTML newsletters opened,
you mustplease activate this
functionfeature. You will need
ana so called SZM link, which you
will getmay obtain from IVW. At the time this documentation was created, IVW charges a fee for this service. Please read the instructions on
the IVW externaltheir website.
Activate BACKCLICK's internal evaluation
BACKCLICK offers a similar version of the IVW evaluation
, butfree of charge.
You must activateActivate this
functionfeature in order to use it. Please note that evaluation is only possible for HTML newsletters. The
percentilepercental evaluation
is alsomay be affected by factors like auto preview, HTML proxy server
,and deactivation of automated reloading of
downloading the same content again.content on mailclient websites.
Activate response tracking and personalized analysis for market research
purposes
BACKCLICK
makes it possible forenables you to relate your subscriber's response data to
thetheir profile data
of your subscribers. That way, you can analyze the response data as it relates to individual subscribersin order to evaluate the responses individual-related. This data may
thenbe exported.
PLEASENOTE: Every nation has its own data-protection laws. You may
have liability ifbe liable for your data and its use
do not conform to these law.
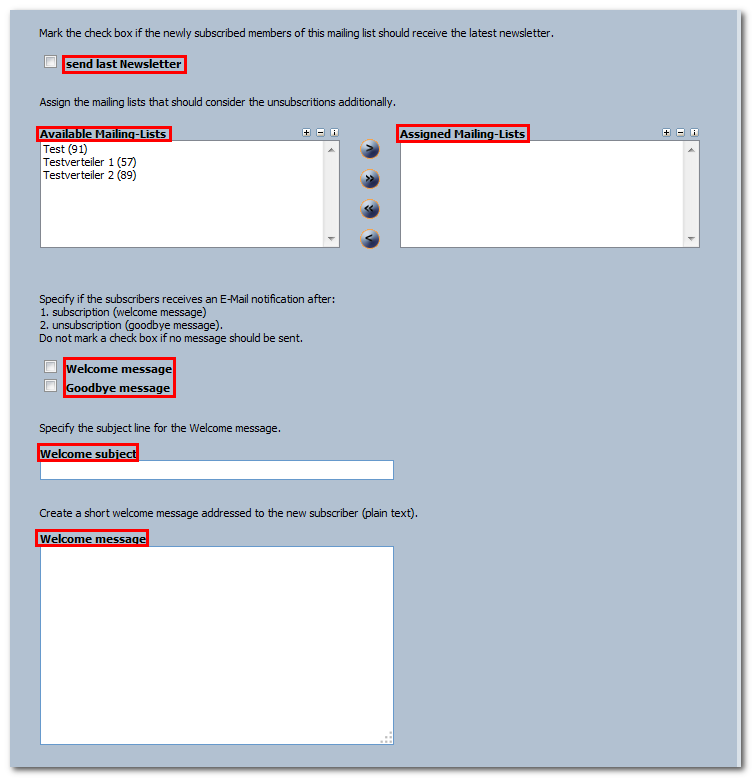
Fig. 3.2.1.5 -
Verteilerliste anlegen (Beispieleingaben, AbschnittCreate a mailing list (Input example, Part 5)
Send last newsletter
If a subscriber
applies oversubscribes via the WebInterface,
he or shethis subscriber will automatically receive the last newsletter sent
by BACKCLICK. This will only happen if
the functionthis feature is activated, of course.
Mailing lists
Please activate this function if a subscriber no longer wants to receive a special newsletter from an allocated mailing list and/or if you want the individual unsubscribed from other lists as well.
PLEASE NOTE: This is ONLY valid for unsubscribing over your IMF filter!
Welcome message/Goodbye message
If you activate this function, two messagesIf you want to remove the subscriber from other mailing lists as well after unsubscribing from this list allocate these other lists here.
PLEASE NOTE: This applies to automatic unsubscriptions done by the IMF filter ONLY!
Welcome/Goodbye message
When activated, an E-Mail confirmation will be sent to your subscribers
. Those who subscribed will receive a “Welcome” message (upon subscribing to or unsubscribing from this mailing list. These procedures are called “confirmed-opt-in”
). Those who unsubscribed will receive a “Goodbye” message (“confirmedand "confirmed-opt-
out”). PLEASE NOTE:out". If you already use the double-opt-in
/out functionprocedure, you do
notNOT have to activate this
functionfeature.
Welcome
-subject
This
messagetext will be
shown in thedisplayed as subject
lineof
theyour welcome
e-mail that BACKCLICK will send.E-Mail.
Welcome message
Write a short welcome message here.The subscriber will receive this message
in plain textafter subscribing.
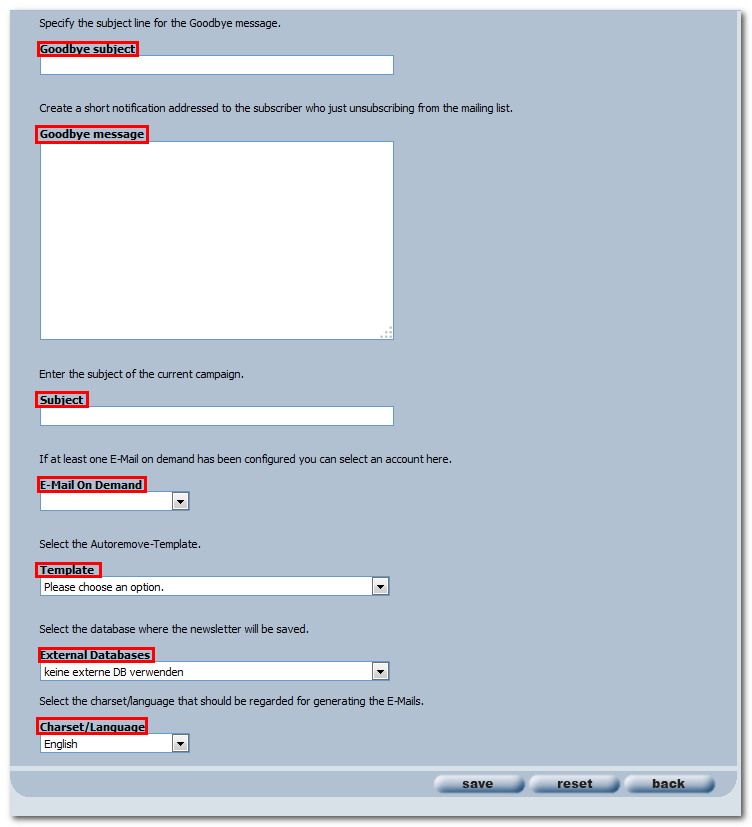
Fig. 3.2.1.6 -
Verteilerliste anlegen (Beispieleingaben, AbschnittCreate a mailing list (Input example, Part 6)
Goodbye
message Write a short notification text here.subject
This text will be displayed as subject of your unsubscribe confirmation.
Goodbye message
The subscriber will receive this message after unsubscribing
from the mailing list.
Subject
WriteEnter the
messagesubject of your
standard'usual' newsletter
here.
ItThis will be
shown in every newsletter you write as the subject line (your default subject
). A current subject may be substituted in every newsletter for the standard one.Subject of test campaign
Please enter a subject line for your test campaign. This subject line will appear in each test campaign that a subscriber requests over the WebInterface.for newly created newsletters. You may replace it with an up-to-date subject anytime.
Test - Newsletter - Subject
This is the subject of test newsletters which can be requested by subscribers via the WebInterface.
E-mail on demand
Diese Funktion ermöglicht es Ihnen bei Rückläufern, die vom System nicht automatisch erkannt werden, eine Antwort Email an den Absender der Rücklauf Email zu versenden. Um diese Antwort Email zu verfassen, lesen Sie bitte KapitelWhen receiving returns that could not be identified by the system automatically, you are able to send a reply to the sender using this feature. Please refer to chapter Email_on_demand
( siehe Seite 403).for details.
Template
The
template “Autoremove” gives subscribers the option of unsubscribing easilyAutoremove-Template offers subscribers an easy way to unsubscribe from your newsletter. You will find some
of these templates when BACKCLICK is delivered, and you may edit them as you like. In addition, you will be able toeditable example templates in delivery state. Additionally, you may create your own template
for unsubscribing. Please read chapter WebInterface - Templates for more information.
You will find all theThis Select-Box shows all existing templates
in this “Select” box.
External databases
If an external database is configured, you may choose it
out of this “Select” boxhere. Any newsletters sent
withusing this mailing list will be stored there. Please read chapter
XX,“System Settings -> External
Databases,”Databases” for more information.
Charset/Language
This is where you must chooseChoose the charset
/and language
in which you want to create you newsletter, so that the characters are displayed correctly.for your newsletter in order to display special characters correctly.
If all settings are
completedone and you want to save them, please click the
button"save" button. If all your
entries areinput is correct
,and the
server isPOP3 and SMTP servers are available, you will see the following confirmation:
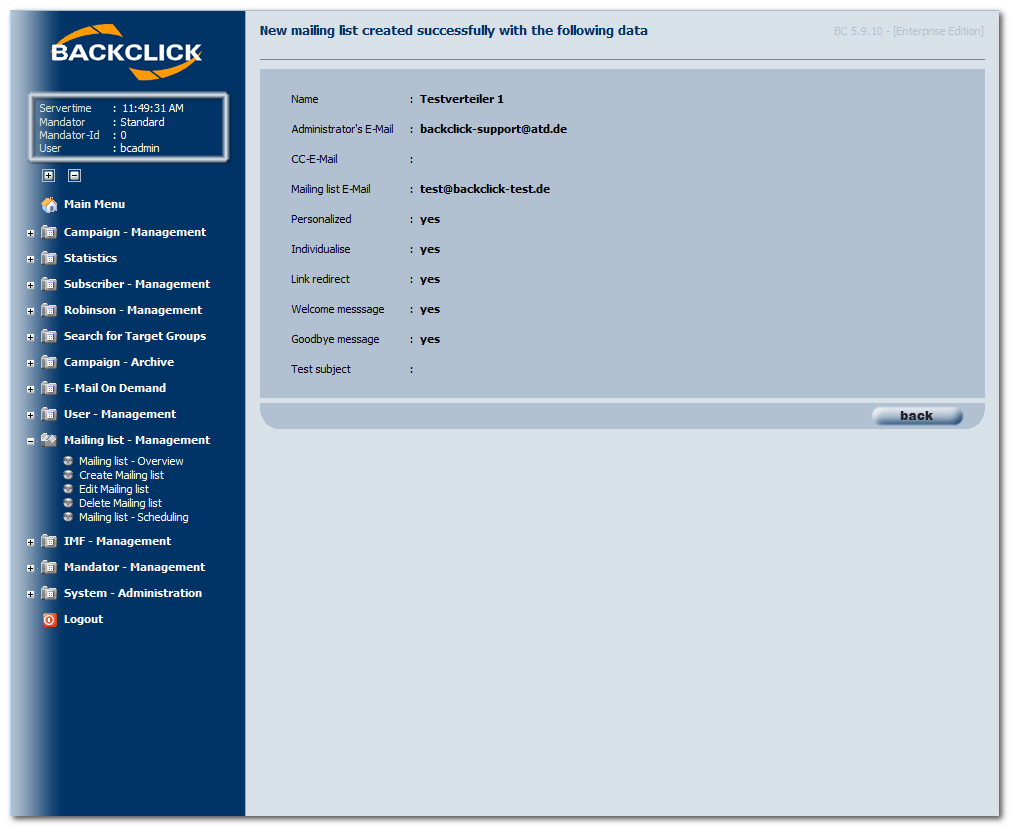
Fig. 3.2.2 -
Verteilerliste angelegt (Beispieleingaben)Mailing list created (Input example)
If an error message is shown
here, please follow the instructions to correct the issue.
If all settings are correct, you
mayare now able to create the first subscriber in your system
, and connect the subscriberand add him/her to this mailing list.