Database designer
The database designer is used to create and manage all the data fields you need for your subscriber database (profile database). The entries will influence the construction of a profile filter, and define the form used to create or edit subscribers within your system. You can create data fields with the help of the database designer for the master data of your subscribers (name and address), for sociodemographic data (age and marital status), and much more. You only need to decide which subscriber information is needed, and insert the predefined data fields. The database designer lets you create and change the input fields of your subscriber database by using your browser interface. These data fields contain information, such as the graphic rendition and the contents. The names of the individual data fields of your subscriber database (such as the salutation, the name, the profession, etc.) are called field names.
These data fields will be used for creating all the templates for subscription, logging off, and other aspects of the design process. The field names are inserted in the templates that are created with the help of the database designer, using BACKCLICK-specific TAGs. That way, the details subscribers enter while requesting or canceling a newsletter will be written into the subscriber database automatically. One advantage is that the same details apply for all templates. You may insert as many input fields as you like for all the data fields required here. An overview of all the data creation fields existing in the system will be displayed under the menu item “System Administration -- > Database Designer.”
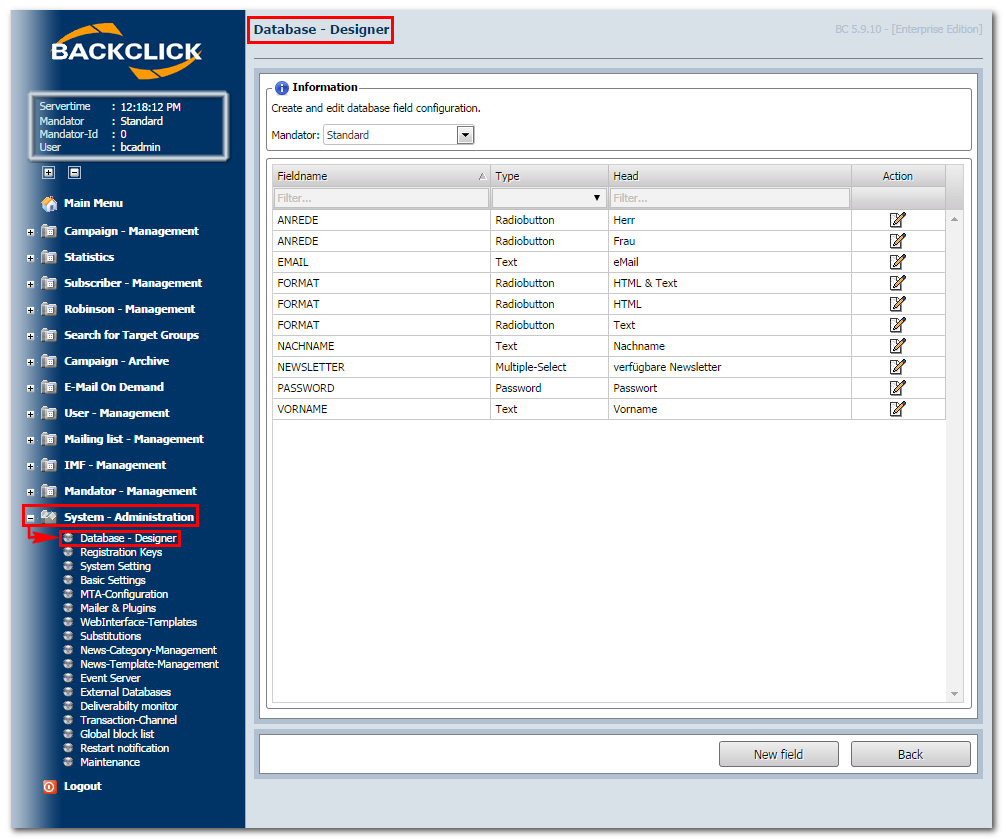
Abb. 18.1 - Feldübersicht Datenbankdesigner
Create new database field
Here is a description of how to construct a new database field. To create the new database field, click on the
"New field"-button. This will open the following dialogue:
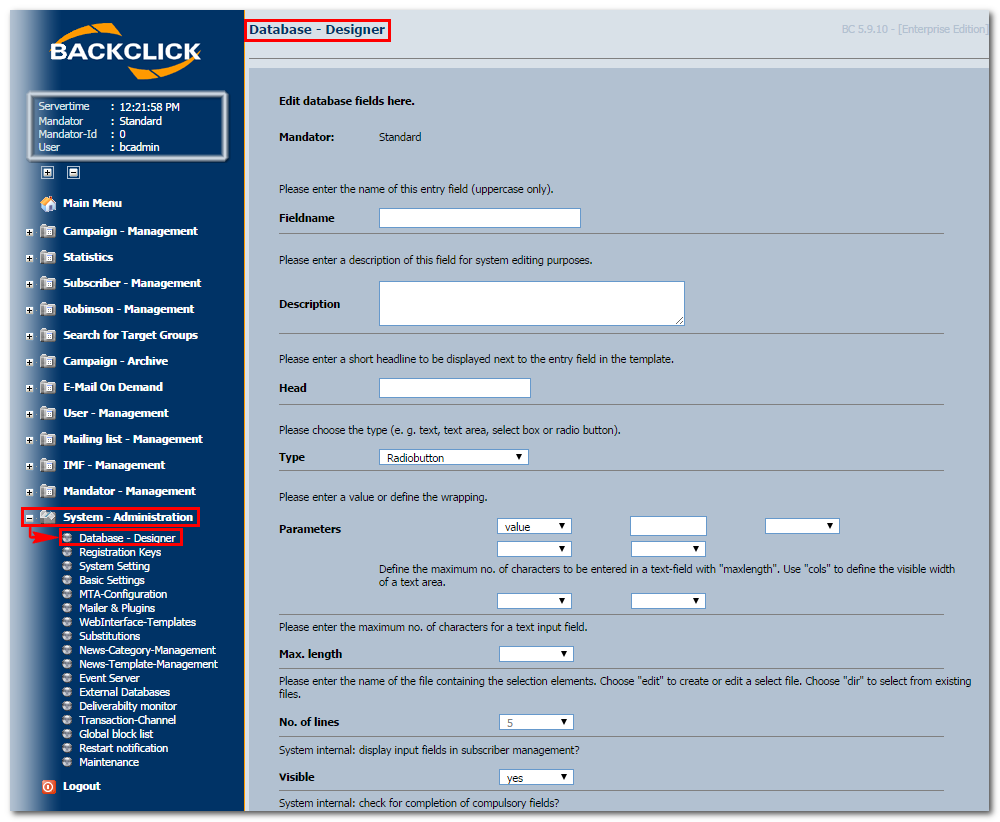
Abb. 18.1.1 - Erstellen eines neuen Datenbankfeldes
Field name
Enter the field name in the first entry field. The name of the data field of your subscriber database is fixed in there. Choose clear and concise names, because these field names are used later on when all the templates are being programmed.
IMPORTANT: Be sure that the field name only consist of capital letters, numbers, and "_" (underscores)
Description
Write a short description of the field name and what it means in the next entry field. This description may only be viewed internally, while you are editing the data fields under the menu items “Edit Subscribers” and “Create Subscribers.”
Headline
The headline is only visible internally, like the description mentioned above. In this example, it would be appropriate to give the headline the same name as the field name.
Type of graphic display
Here you will select the graphic display by choosing which type of display you want. This selection is valid both internally for the system, and for the design of the Web interface templates. As you can see in the select box, you have a choice of seven graphic renditions:
- radio
- checkbox
- select
- select-multiple
- text
- textarea
- password
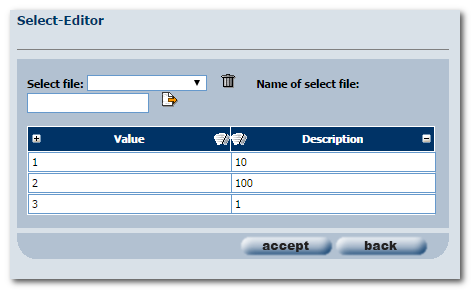
You can use the select editor with the graphic display options “Select” and “Select-multiple.” This may be found approximately in the middle of the form. You may predefine the number of entries and click on the -symbol afterwards. The editor window will then be opened.

If you open the folder “Samples,” you will find some entries in the delivery status:
- ALTER (AGE)
- ANREDE (TITLE)
- BUNDESLÄNDER (STATE)
- EINKOMMEN (INCOME)
- SPRACHE (LANGUAGE)
Additional values can be entered if necessary. If you do not want to use the samples, indicate a value for the select field. This is only visible internally and defines the position. Then indicate the field name that will be displayed later. When you open the select editor, a value or name field is displayed. Clicking on the "Add"-button opens further entry fields. Clicking on the "Clear"-button will remove them, but only if they do not have any contents. If all values are entered, click on the "Save"-button to store the entries. The window closes afterwards, and by clicking on the "Preview"-symbol you can open the entries again. Depending on the number of entries, the “Number of Entries” is adjusted in the input mask. See the sample inputs.
Parameters
Depending on your choice of graphical display, enter a value for the option field (value) here, or indicate “text wrap” for a text field of several lines (wrap).
Maximum Length
Enter the maximum number of signs the text input field may contain.
Number of entries
Define the selectable options for the “Select-/Multiple Select-Boxes” here. How many fields may be selected by the subscriber?
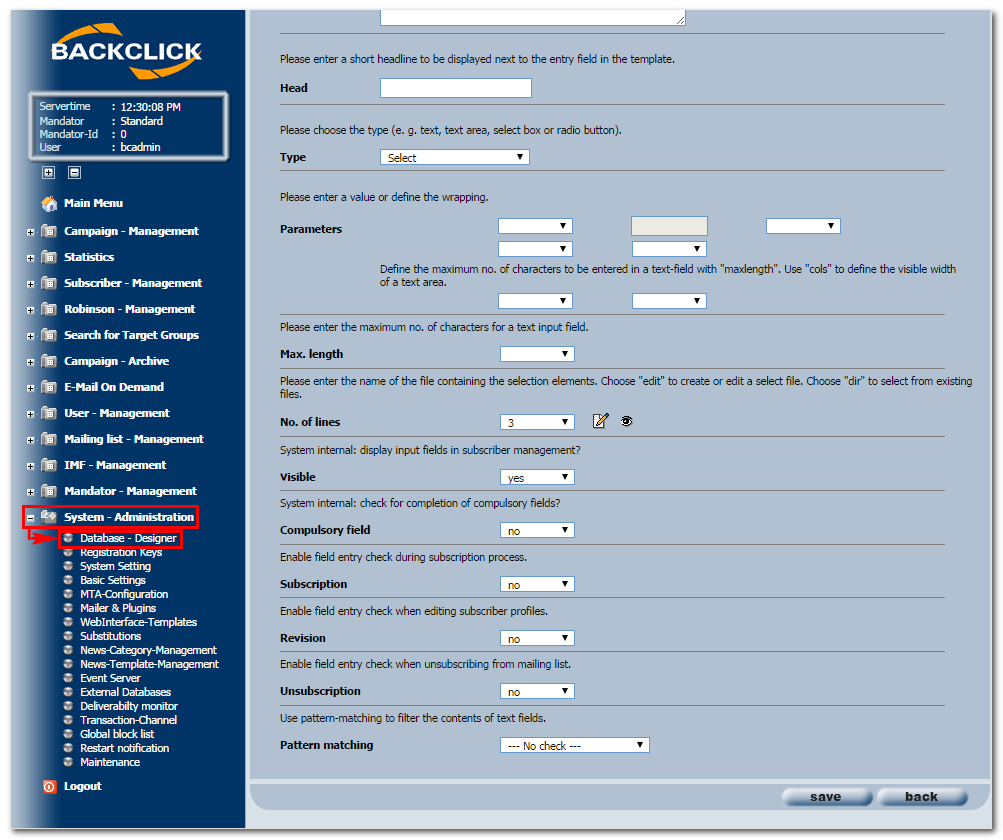
Abb. 18.1.2 - Erstellen eines neuen Datenbankfeldes
Visible
Should this field be visible in the management of subscribers (create, edit)?
Mandatory field
Should this field be checked for completeness in the management of subscribers (create, edit)?
Subscription
Should the entries be checked while subscribing to a newsletter? The entry needs to be added by using the WebInterface. If there is no content in the WebInterface in this field, it is counted as an error and the subscription cannot be completed.
Changes
Should the entries be checked while changing a profile? The entry needs to be added by using the WebInterface. If there is no content in the WebInterface in this field, it is counted as an error and the subscription cannot be completed.
Unsubscription
Should the entries be checked while unsubscribing from a newsletter? The entry needs to be added by using the WebInterface. If there is no content in the WebInterface in this field, it is counted as an error and the subscription cannot be completed.
Identification pattern
You can set an identification pattern for text entry fields (text) in the last line now. If, for example, the subscriber enters the ZIP Code of the state where they live, you select “ZIP Code” as the identification pattern. When this entry is submitted, BACKCLICK will check to see whether all five digits of the ZIP Code have been entered or not. If too few numbers have been entered, the subscriber will receive an error message. Other options may be chosen from the drop-down field shown above.