HTML and Text Campaign Editor
To insert the content of your newsletter, click on the index-tab “Content”. This will open the following entry mask:

Abb. 11.6.4.1 - Kampagnen - Editor (Reiter: Inhalt)
Templates
The predefined templates may be used as samples for newsletters. All of the existing templates are displayed in the overview. Click on a template to select it for use. This will open a separate window:

If you have created the campaign and selected the right template, confirm the query by clicking on the "Yes"-button. Click
on the "No"-button if you are unsure whether the changes were saved.
Editing
After you have selected a template, you can open sections of it to work on, by using the “Drag & Drop” Editor. For our example, we have selected the BACKCLICK-NL. Clicking on the "Edit"-button will automatically open the template inside the “Drag & Drop” Editor:

Abb. 11.6.4.1.1 - "Drag&Drop"-Editor (HTML)
Newsletter
All of the blocks that are contained in the template will be displayed here. There are now three ways to proceed:
1. Edit a Block : Clicking on the , "Edit"-button opens a separate window where the settings and the content of the block will be displayed. You may now change either of these things. The editor may enter the contents of your newsletter under these index tabs. Content may also be assigned to the variables on the query index tab through a Content Data Query.
Example Block:
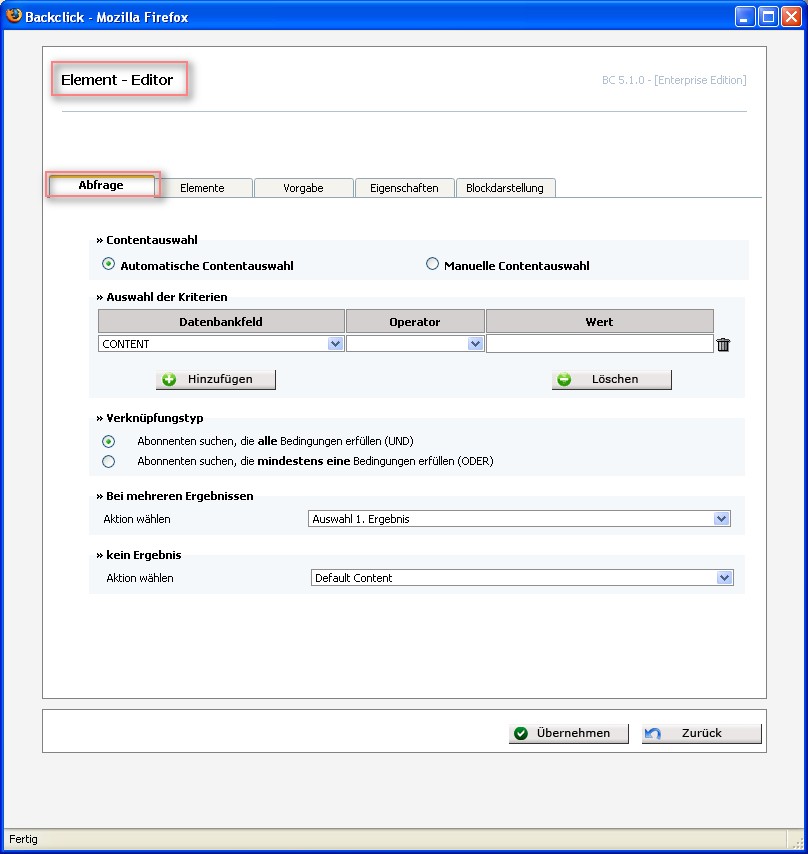
• Index tab: Query
Selection of Content
Selection of the content may be done manually or automatically. If you choose automatic selection, the values of the XML database will be selectable under database fields. While BACKCLICK does not limit the number of conditions, please note that the more conditions you define, the slower the system will work.
If you choose manual selection, a list of all the imported XML data sets will be displayed. You may select ONE out of this list.
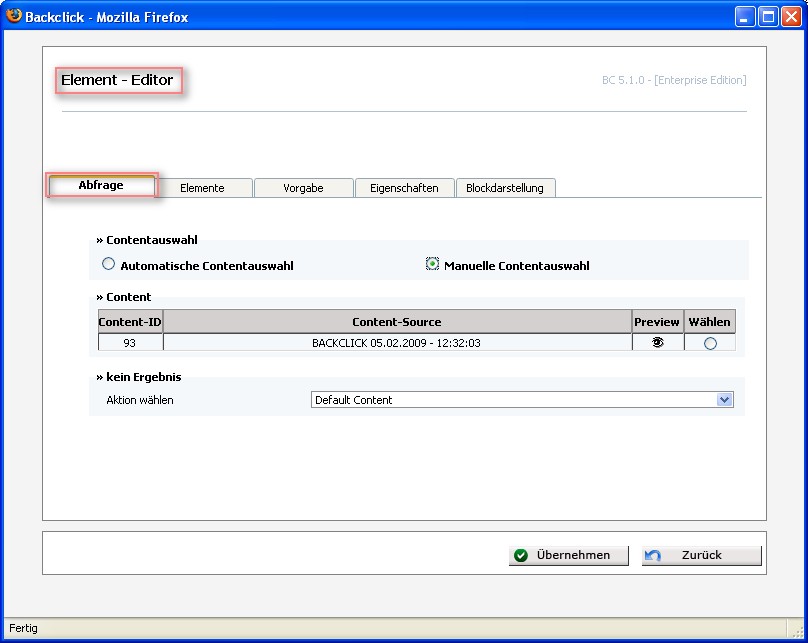
This lets you use a content source that already exists in the system where the required information is included. By clickin on the ( ) -button, you may see a list of content sources displayed in a preview. To select a content source, mark the check box of the content source that should be used.
Combination Type (only for automatic content selection)
Here you must select how the conditions will be connected with each other. Choose AND if all the conditions must be satisfied. Choose OR if it is enough for at least one of the conditions to be correct.
At several results
(only with automatic content selection)
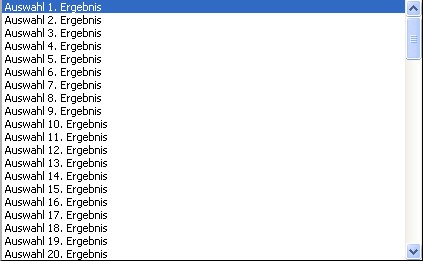
Use the select box to choose your next action. Depending on the number of results, you may define which event
BACKCLICK will consider relevant.
Minimum value: selection of the 1. results
Maximum value: selection of 100. results
No result
In the event of “no result,” you will find a select box for choosing your next action. You may now define whether to show the default content, or to hide the whole block.
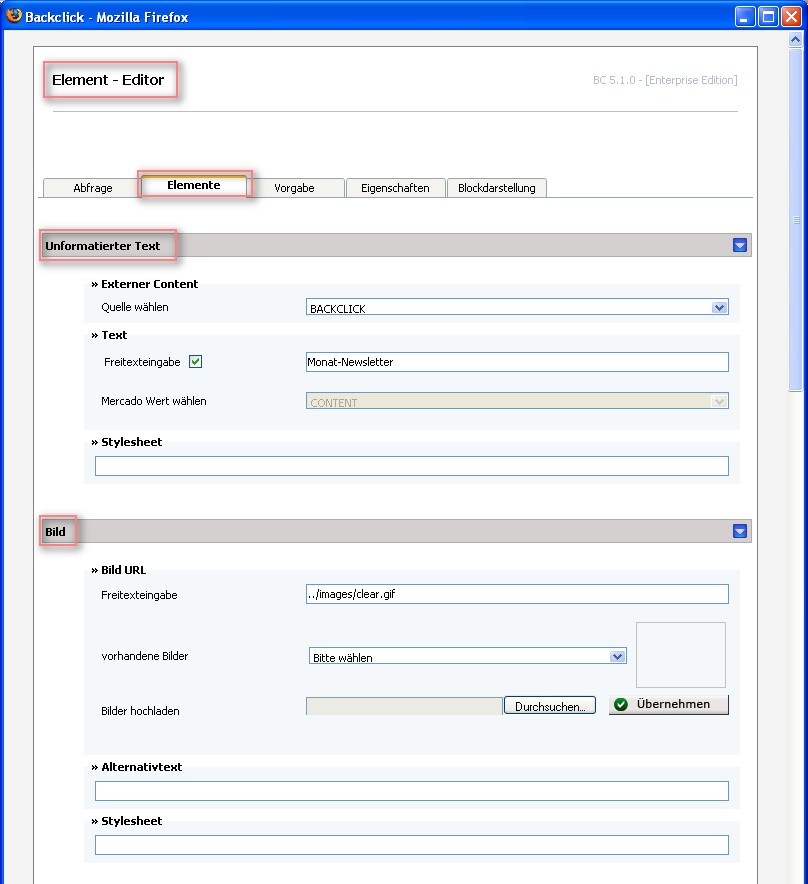
- Index tab: Elements (1)
Variable: Unformatted Text
External Content
All of the external sources are shown in a select box here. Only one external source may be selected!
Text
If you mark the check box after the input text, which you may input freely, you may either enter new text or work on the predefined text here. If this function is deactivated, you may select a Mercado value. PLEASE NOTE: Either the text (input freely) OR a Mercado value must be used.
Stylesheet
You may add editorial style sheets to the block here.
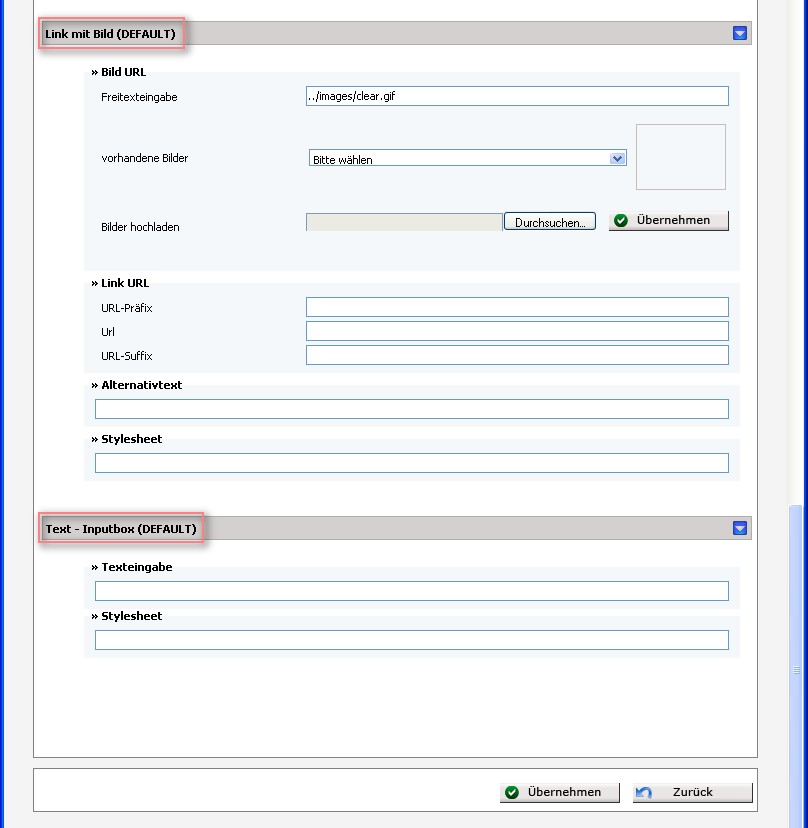
Variable: Picture
Picture URL
- Input text freely: The URL of the picture must be defined here.
- Existing Pictures: Here you will find a select box where you may choose a picture out of the selection of pictures that have already been uploaded to the system. If no pictures have yet been uploaded, the list will be blank.
- Upload pictures: If the select box is empty, or if you do not find the desired picture in the system, you may upload a new one here. First, click on the
 -button, and then choose the file you want by clicking on it. To add the picture to the block, click on the
  -button, and the picture will be shown as a preview in the small preview window.
Alternative Text
To prevent newsletters from being displayed in error, you may enter an alternative text here. This will be shown if the subscriber is unable to view the newsletter correctly. There is no limitation as to the signs you may use to design the newsletter.
Stylesheet
You may add editorial style sheets to the block here.
- Index tab: Elements (2)
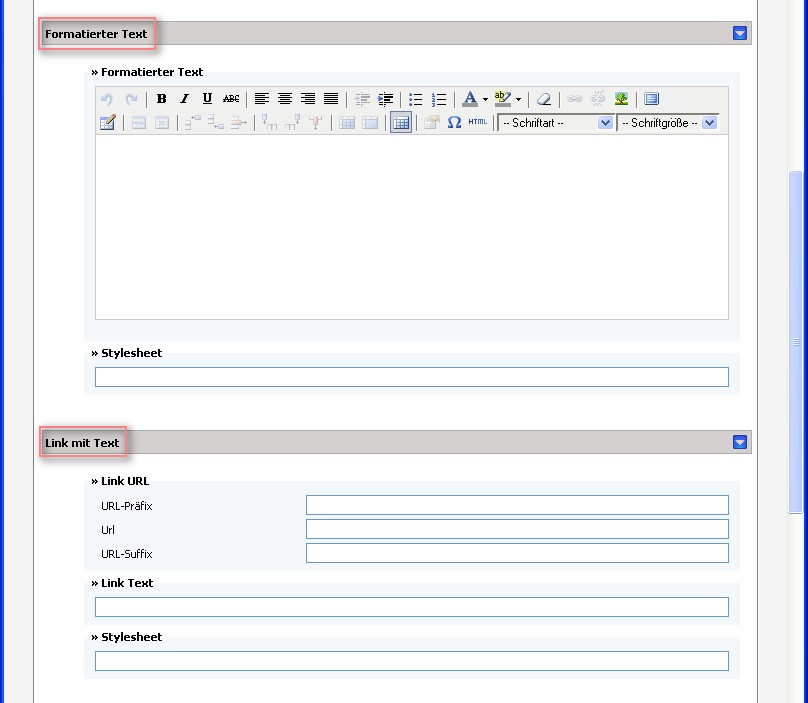
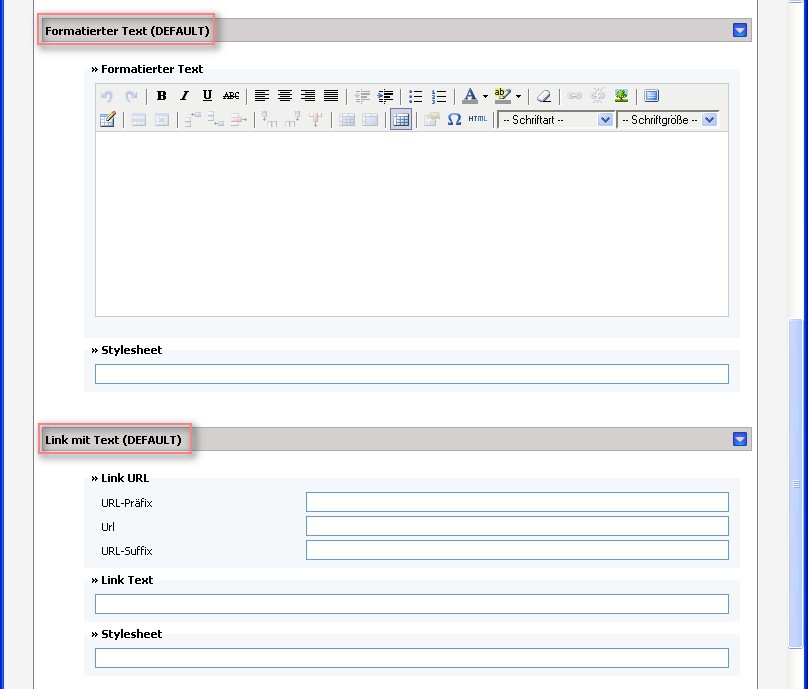
Variable: Formatted Text
Formatted Text
Use the Editor to enter new text, or work on previously entered text.
Stylesheet
You may add editorial style sheets to the block here.
Variable: Link with Text
Link URL
- URL-Prefix (sequence of signs entered in front of the URL): This is usually empty! This entry may be used to integrate a separate link tracking.
- URL: Enter the link here.
- URL-Suffix (sequence of signs entered behind the URL): This is usually empty! This entry may be used to integrate a separate link tracking.
Link Text
The text that should be displayed in your newsletter must be defined here. By clicking on this text, the subscriber will open the URL.
Stylesheet
You may add editorial style sheets to the block here.
- Index tab: Elements (3)
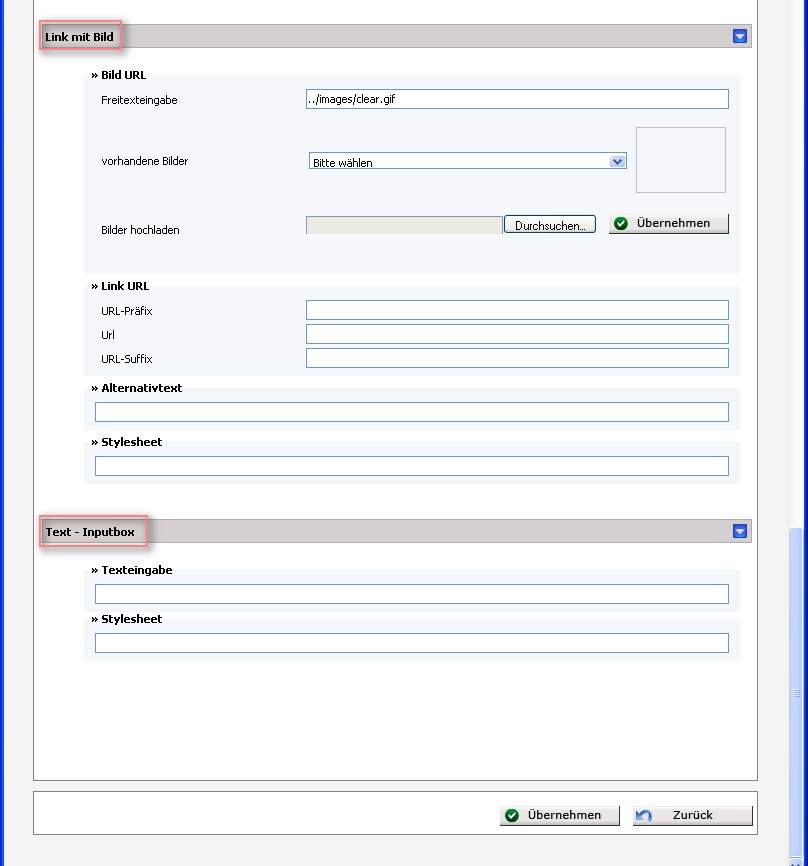
Variable: Link with picture
Picture URL
- Input text freely: The URL of the picture must be defined here.
- Existing Pictures: Here you will find a select box where you may choose a picture out of the selection of pictures that have already been uploaded to the system. If no pictures have yet been uploaded, the list will be blank.
- Upload pictures: If the select box is empty, or if you do not find the desired picture in the system, you may upload a new one here. First click on the -button, and then choose the file you want by clicking on it. To add the picture to the block, click on the -button and the picture will be shown as a preview in the small preview window.
Link URL
- URL-Prefix (sequence of signs entered in front of the URL): This is usually empty! This entry may be used to integrate a separate link tracking.
- URL: Enter the link here.
- URL-Suffix (sequence of signs entered behind the URL): This is usually empty! This entry may be used to integrate a separate link tracking.
Alternative Text
To prevent newsletters from being displayed in error, you may enter an alternative text here. This will be shown if the subscriber is unable to view the newsletter correctly. There is no limitation on signs you may use to design the newsletter.
Stylesheet
You may add editorial style sheets to the block here.
Variable: Text Input Box
Text Input
The text you enter here will be put into the newsletter without any formattings or information of stylesheets.
Stylesheet
You may add editorial style sheets to the block here.
Using the index tab “Default,” you may define default values for all the existing variables. These values will be used by the system whenever no other information has been entered. All of the fields and restrictions described for the index tab “Elements” are valid here as well.
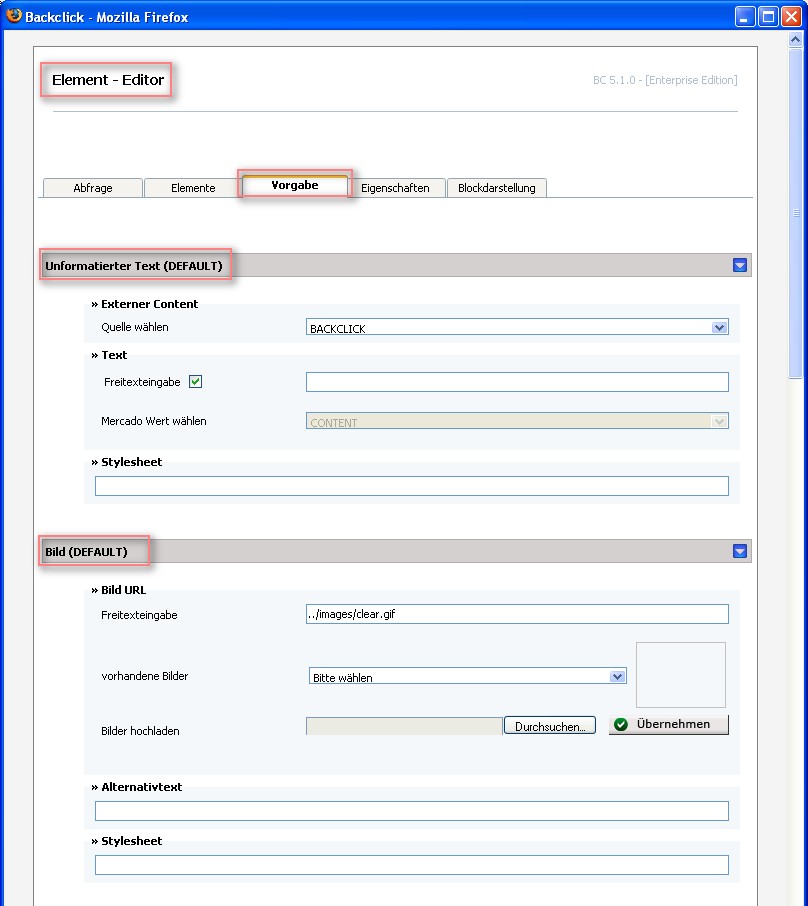
- Index tab: Default (1)
- Index tab: Default (2)
- Index tab: Default (3)
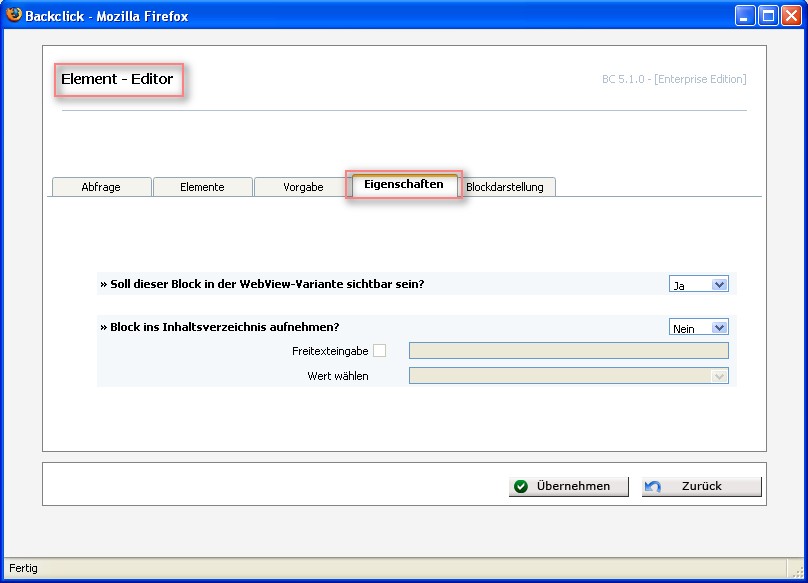
- Index tab: Properties
Should this block be visible in the web view version?
Here you may define whether or not the block will be shown, if the subscriber opens the newsletter in their Web browser.
Show the block in the table of contents?
If you want this block to be included in the table of contents later on, select “YES”. You may also enter the heading for the entry as free text, or as a value of the XML database.
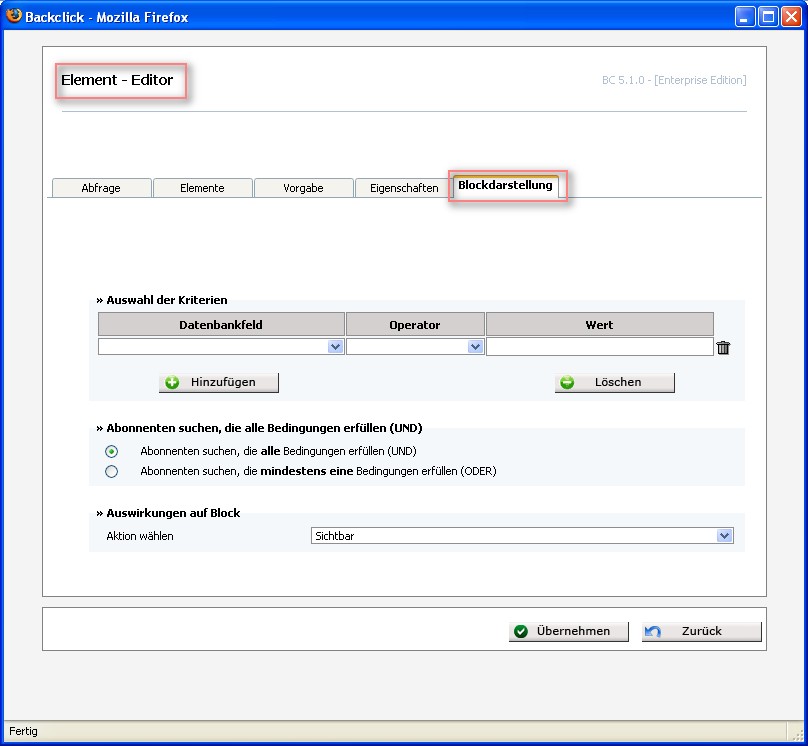
- Index tab: Block displaying
Selection of conditions
Here you will see which subscriber criteria determine whether or not this block will be visible to the subscriber. The established database fields are available here. Many other criteria may also be freely created.
Search for subscriber
Here you must select how the conditions will be connected with each other. Choose AND if all the conditions must be satisfied in order to show the block to the subscriber. Choose OR if it is enough for at least one of the conditions to be correct in order to make the block visible to the subscriber.
Consequence on the block
Here you must decide which action should be executed for the subscriber circle. If you select “Visible,” the block will be shown to the subscriber, but only if the above selected criteria/rules agree with the subscriber’s data. If you select “Not visible,” no one in the subscriber circle will see the block, even if the selected criteria/rules agree with the data of the subscriber.
To save the changes, click on the -button. If no changes were made, or if you do not want to save the changes that you made, click on the  -button. This will close the window. Only the elements, qualities, and block views that are visible to the current user may be changed, depending on the rights of the user.
2. Erase: Clicking on this field will erase the selected block from the template without any further queries. If you have erased a block by mistake, you may add it again by using the block layout. Search in the list for the block you want to add, mark it with a click, and then click on the -button to restore it to the template. By using the block layout, you may also add blocks that were not previously erased.
3. Change the order of the blocks: If the mouse is somewhere in the template, the symbol picture will change into:  . You may now click on the block you want. By holding down the left mouse button, you can move the selected block within the predefined frame: up, down, to the right, or to the left.
If all of the definitions and settings have been closed, click on the  -button. The editor will close automatically and the settings will be saved.
If you also want to work on the text version of your newsletter, click on the  -button. This will open a separate window, with the following editor:
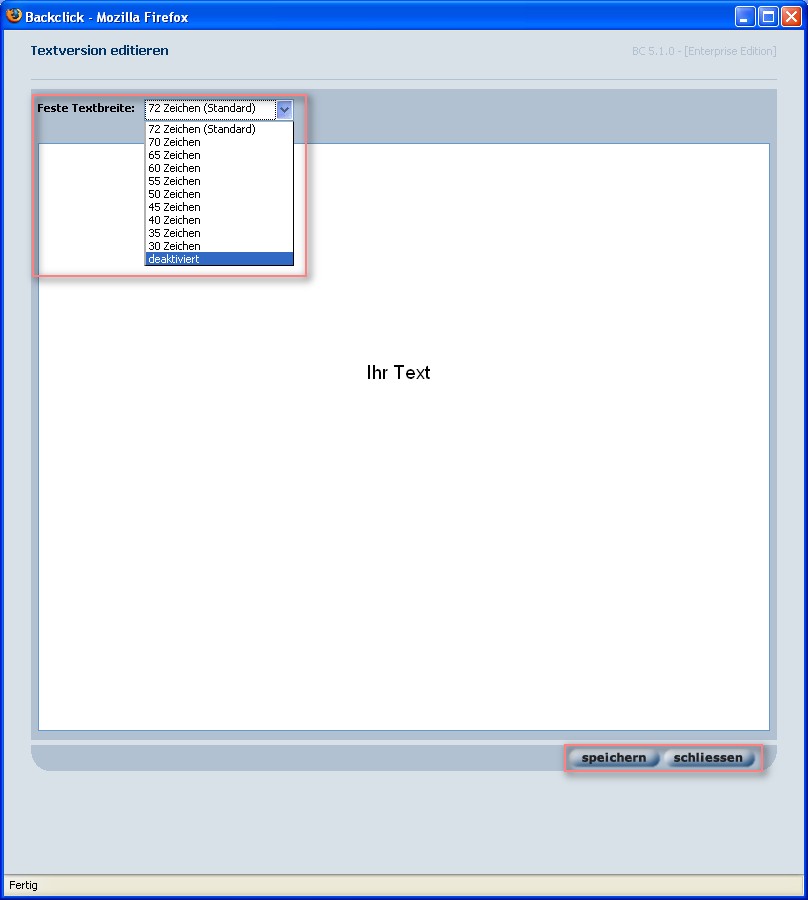
Abb. 11.6.4.2 - Texteditor
BACKCLICK lets you define the text width. The text is as wide as a line indicated here, after which a line break is generated automatically. If this function is deactivated, the characters are displayed exactly as they were entered. After you have entered the complete text, click on the  -button to save the entries. The window stays open until the
  -button is selected. After this, the window will close. If you did not click on the -button, all the new entries will be lost.
Preview/Test sending
Click on the  -button, to open a separate window where a preview of the newsletter will be displayed.
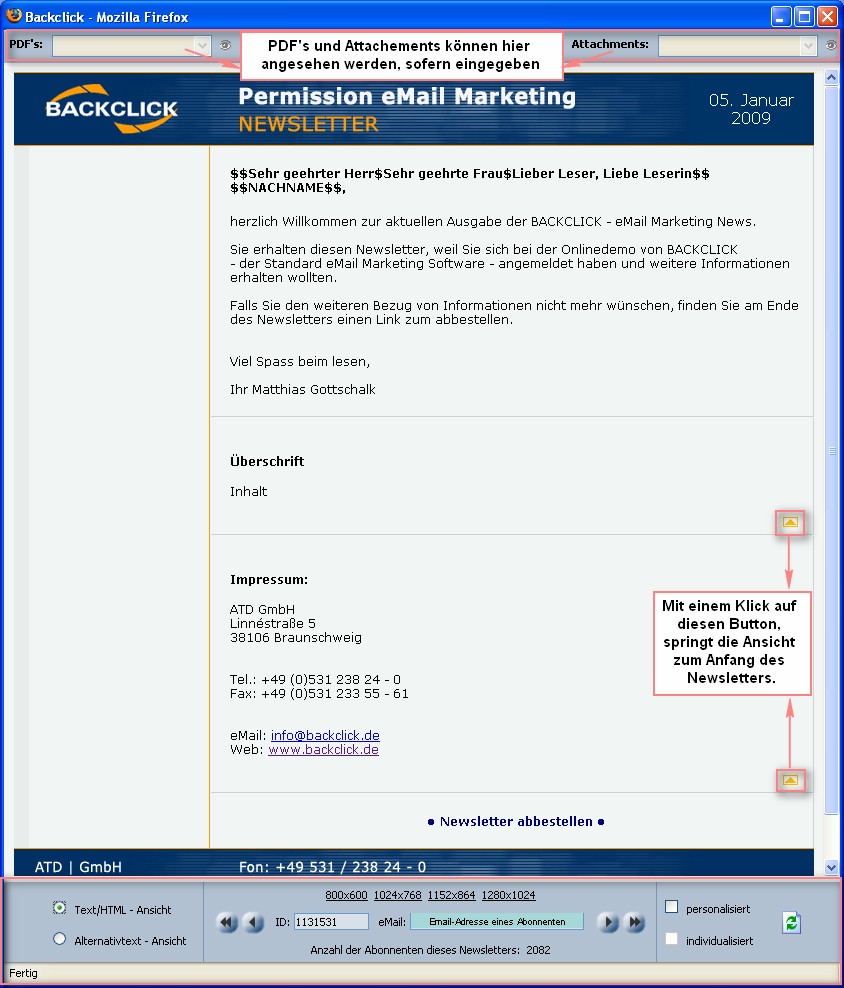
Abb. 11.6.4.3 - Vorschau Newsletter
You cannot work on this template; a view is provided only to check the settings and contents. If you start sending now, the subscribers will receive the newsletter as displayed. Both the text/HTML view and the alternative text view are displayed here. By clicking on the corresponding radio button ( ) you can display both views in the window, to choose and update either of them. The size of the window may also be selected here — but only for the present view, not what the subscribers see. You will also see the number of selected subscribers that would receive this newsletter if you sent it out now. Personalization/Individualization may also be shown, if you select the corresponding check box. To update the page, click on the -button. Close the window by clicking on
  . If you want to make sure that the subscribers will get the newsletter as you intended, you may do a test sending. Click on the
  -button, and the newsletter will be sent to the e-mail address that has been entered in the personal settings.
Status
This is where you can adjust the status of the newsletter campaign. It may be stored as a draft (to be finished) or as ready to send (but you can work on it some more before sending it out). The campaign is then displayed in the overview of all newsletters and campaigns, with the corresponding status.